DIY Wedding – Heart Shaped Chair Ornaments
Happy Valentine’s Day!! For me Valentine’s is a day to remember your loved ones and to do something special for them. Be that friends, family, significant others or coworkers!
Valentine’s Day is also a great day for DIY projects. So why not incorporate that into your wedding. Ever wondered what to put at the back of the bride & grooms chair?? Well today we are going to make little heart shaped ornaments that can be tied into a ribbon or hung over the back of both the bride’s and grooms chair.
.JPG)
What You’ll Need:
- Poster Board or Any Heavy paper in the colours of your choice
- White Glue and/or Hot Glue Gun
- Printed Stationary (explained in step 1)
- String or rope in the colour of your choice
- Scissors or utility knife
Step 1:

Using the paint program (or equivalent), make your own Bride & Groom stationary like shown in the picture above. I took different text styles and sizes moved them around, rotated, italicize and bolded to make a block. Then I took the block copy and pasted multiple times to form the page. Print and your done. You can do this in different colours or if you have great calligraphy skills or penmanship you can do this by hand also.
Step 2:


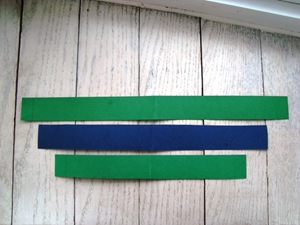
Cut out 3 strips of heavy paper (like poster board) about 11/2 inch in width per ornament (you’ll need at least 6). You can make them any length depending on how big you’d like the ornament to be. Each inch should be 2 inches shorter than the next. In my case my lengths were 14’, 12’, and 10’ long. They can be in any colour of your choice, multi-coloured like mine or monochromatic.. or even different shades of the same colour. At both edges of your strips mark a line 1/2 an inch down across the width.
Step 3:


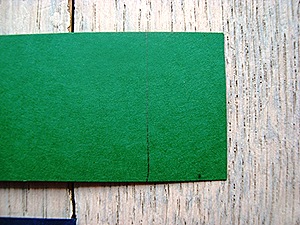
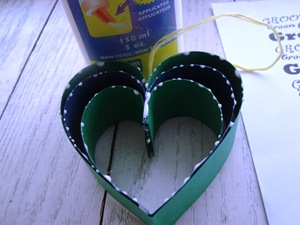
Fold each strip in half and form a hard crease. Open up again. Using the longest strip as the outer layer line up the second longest along the crease and glue. You will want to glue about 1 inch up on either side of the crease. Repeat with the smallest length.
Step 4:


Starting with the inner strip and using the 1/2 inch line you made at the edges of each strip, glue within the 1/2 inch rectangle and press the middle strip on top aligning the edges. Repeat with the outer strip being pressed down onto the middle and small strip. Do this for both the right and left side. Now all of your strips should be glue together on each side like in the photo above.
Step 5:


Cut a small piece of string or rope. Loop the rope by holding the bottom edges together. Place a dab of glue on the left OR right side of the still open ornament. Slide the string or rope into the glue. If using a hot glue gun try not to burn your fingers. You don’t have to press it in the glue you just need it to lay in the glue.
Step 6:


Glue both sides of the edges (again filling about 1/2 inch with glue at both edges). Curl the edges around so that the meet each other in the centre, press and hold edges together so the glue sets and the two sides stay together.
Step 7:

Dabble white glue along the edges of the heart. Place the heart glue side down onto your bride OR groom stationary. Lay a book over it and let dry. Once dry cut around along the outside of your heart. Repeat with your other ornament on the other stationary that you didn’t use (bride or groom).
VOILA!!! Your heart shaped ornament is complete. One for the bride one for the groom!


Comments
Post a Comment