DIY Simple Paper Bow and Poinsettia Bow
Hello and welcome to a DIY Wednesday!!!
Today we are helping you make 2 Paper Bows. A simple bow and for the Christmas season a Poinsettia Bow.
Below are some step by step instructions on how we make both! ALL images can be clicked for a larger view!
WHAT YOU NEED:


Below you will find a link to the Template google doc that you can download and print for your own use. If you are using the template skip to step 2. But if you wanted to make your own bow in your own size then above pictures show how I made mine, and below are instructions.

For top part of the bow I measured 8 inches out. Marked the centre point. Between the centre and 1 end I marked the centre point again. From that centre point I measured 1.5 inches of thickness (on your ruler look for 1.5 inches, find the centre between 0 and 1.5 inches and line that up with the centre point draw a line). Do the same for the other section. At both ends and the centre point of the full 8 inches measure a 0.5 inch thickness using the same method as in the brackets, draw a line. From the end curve a line up to the top of the 1.5 thickness and then curve down again to the centre point, from the centre point curve a line up to the top of the 1.5 thickness and then down to the other end. Do the same at the bottom and you have the top of the bow.
For the bottom part (the ribbon looking part), I measured out 5 inches. Find the centre point and mark it. Measure a 0.5 thickness at the centre point like you did for the top bow above and draw a line. At both end points measure a 1.5 thickness and mark. From the end points measure in 0.5 inches and mark. From the top of the 1.5 thickness draw a straight line to the mark at 0.5 inches do the same from the bottom point (this will make the inverted triangle shape). From the top of the 1.5 thickness curve a line to the centre point, from the centre point curve a line to the top of the 1.5 thickness at the other end. Do the same for the bottom part and you have the bottom of the bow.
For the centre strip. Measure it is a rectangle measuring 0.5 inches height and 2 inches width.
STEP 2 – SIMPLE BOW


After you've made or printed your template I would suggest using a thicker paper or thin cardboard for multiple reuses. Once that’s complete draw the template on to your paper of choice for your bow. I am using to colours, a turquoise and a deep yellow. Once drawn cut. You need 1 of each of the 3 template pieces to create 1 bow (see below).

STEP 3 – Making your Bow


Take the top part of the bow. Add glue (I use hot glue) and add a dab close to the centre (or in the red circle area of the above photo). Bend without creasing and stick the end down aligning with the centre line (see 2nd photo above). Repeat on the other side.


Take your completed top part of the bow and glue it to the bottom part of your bow aligning both centres so just the tips of the bottom part show (see second photo above).

On the back of your completed bow add a dab of glue to the centre (or in the red circle area in photo above). Take your remaining centre strip of paper and wrap around the middle.
VOILA!

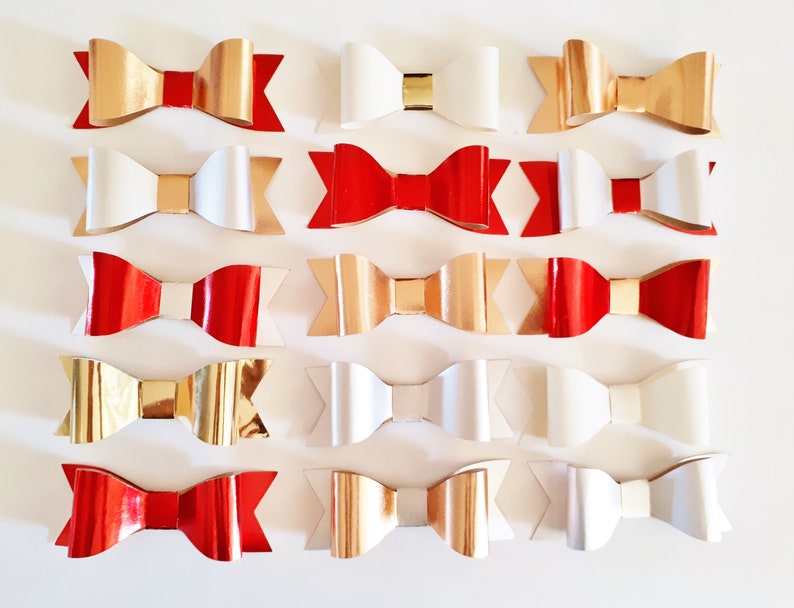
Your simple bow is now complete! You can add jewel embellishments or pearls. You can use different coloured paper or patterned paper to give you the perfect look you desire!!


STEP 1 – POINSETTIA BOW TEMPLATE


For the Poinsettia Bow you need to draw out 3 Top part pieces on Red paper and 3 Bottom part pieces in green (please note you can use any colour of choice as it will just resemble a flower bow). Once drawn cut for both.
STEP 2 – Making your Poinsettia Bow


Arrange the 3 pieces of the top part of the bow at equal distance over lapping at the centre and glue. Repeat for the bottom part (see photo above).

1 by 1 bend without creasing each end to the centre part of the bow. Each part will slightly overlap the next.

Once completed the top and bottom piece should look like the photo above.
STEP 3 – Bow Arrangement


To arrange your bow you can either align the petals of the top part of your bow with the bottom part of your bow like in photo 1 above or you can shift the bow so the petals align in between each of the leaves on the bottom part of the bow like in photo 2. For mine I chose to align directly above each leaf. Once decided glue.
STEP 4 – Centres


Choose a centre for your poinsettia bow that you like. Above I gave examples. In photo 1 I cut a circle out of green paper and a slightly smaller circle out of red. Over lapped evenly and glue. Photo 2 is a yellow circle that I have fringe cut at the edge. Photo 3 is a jewel centre. Photo 4 the fringe circle with a jewel embellishment and Photo 5 is the green and red circle with a jewel embellishment.
For mine I chose the yellow fringe circle with the jewel embellishment!!
VOILA! Your poinsettia bow is complete. And both bows are perfect to attach to gift boxes, bags and cards to add a little pizzazz!


Here is the downloadable template ----> Template Download
If you create one of these bows we’d love to see them!!! Post your photos or links to your photos below!!!!
Thanks so much for joining in and making with us!!! See you next week on DIY Wednesday!
Today we are helping you make 2 Paper Bows. A simple bow and for the Christmas season a Poinsettia Bow.
Below are some step by step instructions on how we make both! ALL images can be clicked for a larger view!
WHAT YOU NEED:
- Scissors
- Glue (I use Hot glue but tacky glue will work)
- Template
- Cardboard or thick paper for template
- 4 sheets of Cardstock or Paper in the colour of your choice
- Embellishments (optional)
Below you will find a link to the Template google doc that you can download and print for your own use. If you are using the template skip to step 2. But if you wanted to make your own bow in your own size then above pictures show how I made mine, and below are instructions.
For top part of the bow I measured 8 inches out. Marked the centre point. Between the centre and 1 end I marked the centre point again. From that centre point I measured 1.5 inches of thickness (on your ruler look for 1.5 inches, find the centre between 0 and 1.5 inches and line that up with the centre point draw a line). Do the same for the other section. At both ends and the centre point of the full 8 inches measure a 0.5 inch thickness using the same method as in the brackets, draw a line. From the end curve a line up to the top of the 1.5 thickness and then curve down again to the centre point, from the centre point curve a line up to the top of the 1.5 thickness and then down to the other end. Do the same at the bottom and you have the top of the bow.
For the bottom part (the ribbon looking part), I measured out 5 inches. Find the centre point and mark it. Measure a 0.5 thickness at the centre point like you did for the top bow above and draw a line. At both end points measure a 1.5 thickness and mark. From the end points measure in 0.5 inches and mark. From the top of the 1.5 thickness draw a straight line to the mark at 0.5 inches do the same from the bottom point (this will make the inverted triangle shape). From the top of the 1.5 thickness curve a line to the centre point, from the centre point curve a line to the top of the 1.5 thickness at the other end. Do the same for the bottom part and you have the bottom of the bow.
For the centre strip. Measure it is a rectangle measuring 0.5 inches height and 2 inches width.
STEP 2 – SIMPLE BOW
After you've made or printed your template I would suggest using a thicker paper or thin cardboard for multiple reuses. Once that’s complete draw the template on to your paper of choice for your bow. I am using to colours, a turquoise and a deep yellow. Once drawn cut. You need 1 of each of the 3 template pieces to create 1 bow (see below).
STEP 3 – Making your Bow
Take the top part of the bow. Add glue (I use hot glue) and add a dab close to the centre (or in the red circle area of the above photo). Bend without creasing and stick the end down aligning with the centre line (see 2nd photo above). Repeat on the other side.
Take your completed top part of the bow and glue it to the bottom part of your bow aligning both centres so just the tips of the bottom part show (see second photo above).
On the back of your completed bow add a dab of glue to the centre (or in the red circle area in photo above). Take your remaining centre strip of paper and wrap around the middle.
VOILA!
Your simple bow is now complete! You can add jewel embellishments or pearls. You can use different coloured paper or patterned paper to give you the perfect look you desire!!
STEP 1 – POINSETTIA BOW TEMPLATE
For the Poinsettia Bow you need to draw out 3 Top part pieces on Red paper and 3 Bottom part pieces in green (please note you can use any colour of choice as it will just resemble a flower bow). Once drawn cut for both.
STEP 2 – Making your Poinsettia Bow
Arrange the 3 pieces of the top part of the bow at equal distance over lapping at the centre and glue. Repeat for the bottom part (see photo above).
1 by 1 bend without creasing each end to the centre part of the bow. Each part will slightly overlap the next.
Once completed the top and bottom piece should look like the photo above.
STEP 3 – Bow Arrangement
To arrange your bow you can either align the petals of the top part of your bow with the bottom part of your bow like in photo 1 above or you can shift the bow so the petals align in between each of the leaves on the bottom part of the bow like in photo 2. For mine I chose to align directly above each leaf. Once decided glue.
STEP 4 – Centres
Choose a centre for your poinsettia bow that you like. Above I gave examples. In photo 1 I cut a circle out of green paper and a slightly smaller circle out of red. Over lapped evenly and glue. Photo 2 is a yellow circle that I have fringe cut at the edge. Photo 3 is a jewel centre. Photo 4 the fringe circle with a jewel embellishment and Photo 5 is the green and red circle with a jewel embellishment.
For mine I chose the yellow fringe circle with the jewel embellishment!!
VOILA! Your poinsettia bow is complete. And both bows are perfect to attach to gift boxes, bags and cards to add a little pizzazz!
Here is the downloadable template ----> Template Download
If you create one of these bows we’d love to see them!!! Post your photos or links to your photos below!!!!
Thanks so much for joining in and making with us!!! See you next week on DIY Wednesday!


Comments
Post a Comment